Protected by Copyscape
Powered By Blogger

Saturday, March 26, 2022

How to upload a picture(jpg, png etc) using Selenium API without using Auto IT and Sikuli?

To upload a picture using Selenium API, I have written the following lines of code where I am making a use of Robot class instead of using Auto IT because Auto IT does not work on mac machine except windows.

In the below example I have used the following link where I am able to upload the pic using Robot class successfully.

https://www.google.com/local/place/rap/edit/hoursv2?sa=X&ved=2ahUKEwi1mr-lt-L2AhXdxL4IHTZfCtkQ_s8EegQIABAH&isEmbedded=true


import org.openqa.selenium.By;

import org.openqa.selenium.WebDriver;
import org.openqa.selenium.chrome.ChromeDriver;
import io.github.bonigarcia.wdm.WebDriverManager;
import org.openqa.selenium.chrome.ChromeOptions;


import java.awt.*;
import java.awt.datatransfer.Clipboard;
import java.awt.datatransfer.StringSelection;
import java.awt.event.KeyEvent;
import java.util.Collections;
import java.util.concurrent.TimeUnit;

public class Query
{
static WebDriver driver;
public static void main(String args[]) throws AWTException
{
WebDriverManager.chromedriver().setup();
ChromeOptions options=new ChromeOptions();
options.setExperimentalOption("excludeSwitches", Collections.singletonList("enable-automation"));

driver=new ChromeDriver(options);
driver.manage().window().maximize();
driver.manage().timeouts().implicitlyWait(20, TimeUnit.SECONDS);
driver.manage().deleteAllCookies();

driver.get("https://www.google.com/local/place/rap/edit/hoursv2?sa=X&ved=2ahUKEwi1mr-lt-L2AhXdxL4IHTZfCtkQ_s8EegQIABAH&isEmbedded=true");
driver.findElement(By.xpath("//span[contains(text(),'Add a photo')]")).click();


Robot robot = new Robot();
Clipboard clipboard = Toolkit.getDefaultToolkit().getSystemClipboard();
StringSelection stringSelection = new StringSelection("C:\\Users\\StapleAutomation\\OneDrive\\Desktop\\B1.jpg");
clipboard.setContents(stringSelection, null);

robot.keyPress(KeyEvent.VK_CONTROL);
robot.keyPress(KeyEvent.VK_V);
robot.keyRelease(KeyEvent.VK_V);
robot.keyRelease(KeyEvent.VK_CONTROL);

//Simulate Enter key event
robot.keyPress(KeyEvent.VK_ENTER);
robot.keyRelease(KeyEvent.VK_ENTER);
}
}


********************************************************************************************************

Sunday, March 20, 2022

How to create Basic Library in UiPath Studio?

The following tutorial will walk you through the steps of creating a library in Studio, publishing and using it in other automation projects.

Creating a library is similar to Creating a Basic Process. The difference is packages are for creating reusable components to be used in the context of other projects.

This example gets data from an Excel spreadsheet and appends it to another Excel file. Next, it walks you through the steps for packaging and publishing the project to a custom feed, installing the package to another project, and using the activity it contains.

This example uses Excel activities that do not require Microsoft Excel to be installed on your machine.

Let’s begin.

Creating a Library

  1. Launch Studio. In the HOME Backstage view, click Library to create a new library project. The New Blank Library window is displayed.
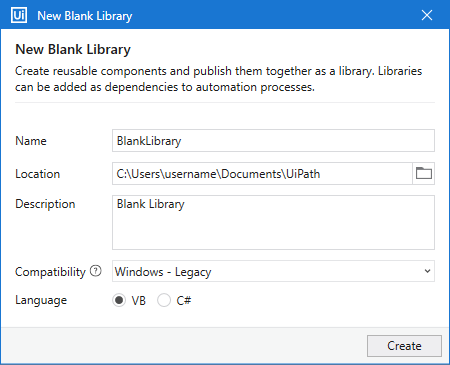
  1. In the New Blank Library window:
    • Enter a name for the new project and a description that summaries what you are aiming to do with this automation. For this example, you can use the name QuickLibrary.
      Note: The project name cannot exceed 128 characters, and the description cannot exceed 500 characters.
    • Select the location where to create the project.
    • Select Windows - Legacy for the Compatibility option and VB for Language.
  2. Click Create. The new library is opened in Studio.

Adding Excel Activities

  1. In the Activities panel, search for the Read Range activity under System > File > Workbook, and drop it to the Designer panel.
    • In the Workbook path field, add the path to the Excel file from which you want to get the data.
    • In the Sheet Name field, add the name of the spreadsheet. For this example, the name remains the default Sheet1.
    • In the Range field, add the range of cells to be read. For this example, leave the field empty so that all cells are read.
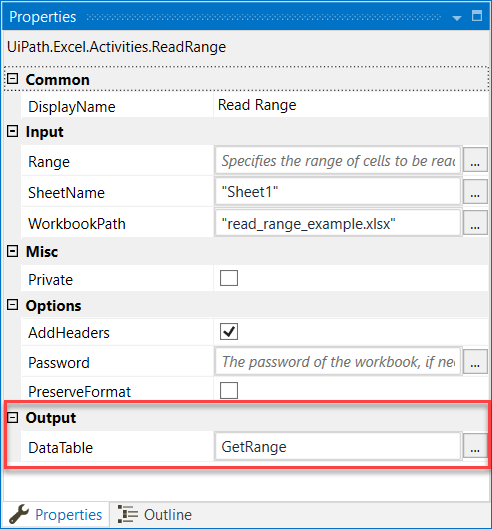
  2. In the Properties panel of the Read Range activity, click the field next to DataTable, then use the Ctrl + K keyboard shortcut to open the variable field, and add the name GetRange. The type DataTable variable stores data from the read cells.
  1. In the Activities panel, search for the Append Range activity under System > File > Workbook. Add it below the Read Range activity.
    • In the Workbook path, add the path to the file where you want to append the copied data.
    • In the Sheet name, add the name of the sheet. For this example, leave the default Sheet.
    • In the Data table field, add the previously created variable GetRange which stores the information. Your project should look like in the image below.
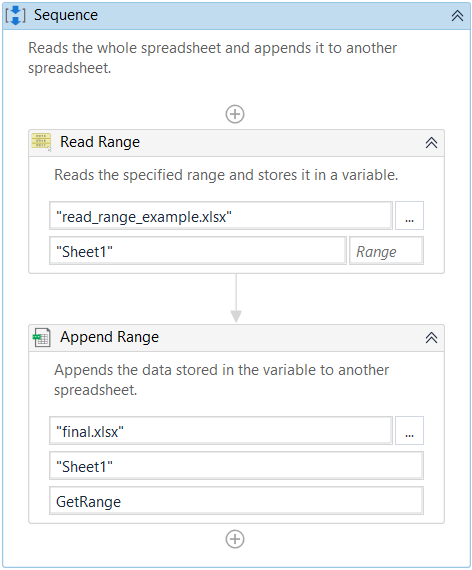
  1. In the ribbon, click Run File or use Ctrl + F6 to execute the workflow. The data gathered from the first Excel spreadsheet is appended to another. It does not replace data that already exists in the second spreadsheet.

Packaging a Library

To add this library as a reusable component to other automation projects, you need to package it as a .nupkg file by publishing the project.

  1. Open the library project in Studio.
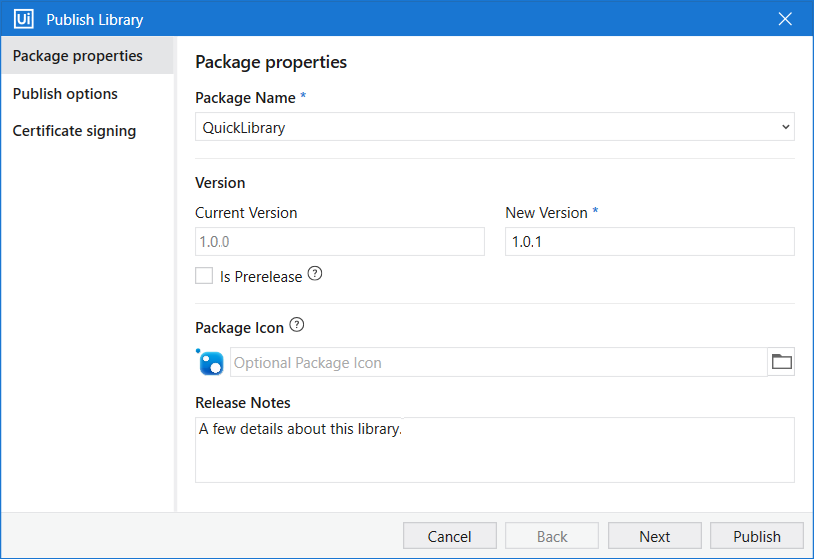
  2. From the ribbon, click the Publish button. The Publish Library window opens.
    • In the Package properties tab, enter a package name. In the Release Notes field, add a few details about the library. This is useful for tracking the changes made to the library in each new published version.
    • In the Publish options tab, select Publish to > Custom, and then, in the Custom URL field, add the path to a local folder. For example, you can create a myfeed folder on your Desktop.
  3. Click Publish. The package is now available in the local folder as a .nupkg file.
Installing Reusable Components

To use the package in another project, you first need to add it as a project dependency. 

Adding a Custom Feed

  1. In the Studio ribbon, click Manage Packages > Settings. The default and user-defined feeds are displayed.
  2. In the User defined packages sources container, add a name for your feed in the Name field. In the Source field, add the path to the folder where you published your library to.
  3. Click Add. Your new feed is added to the section.
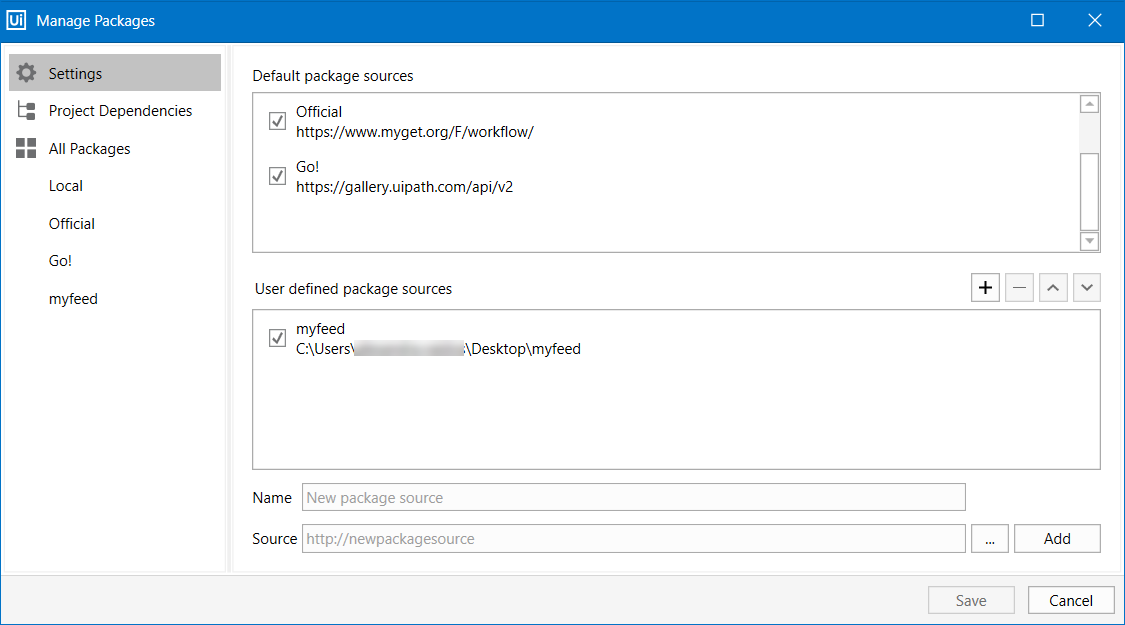
You need to follow the above steps whenever you want to add or remove a user-defined feed in Studio. 

Installing the Package

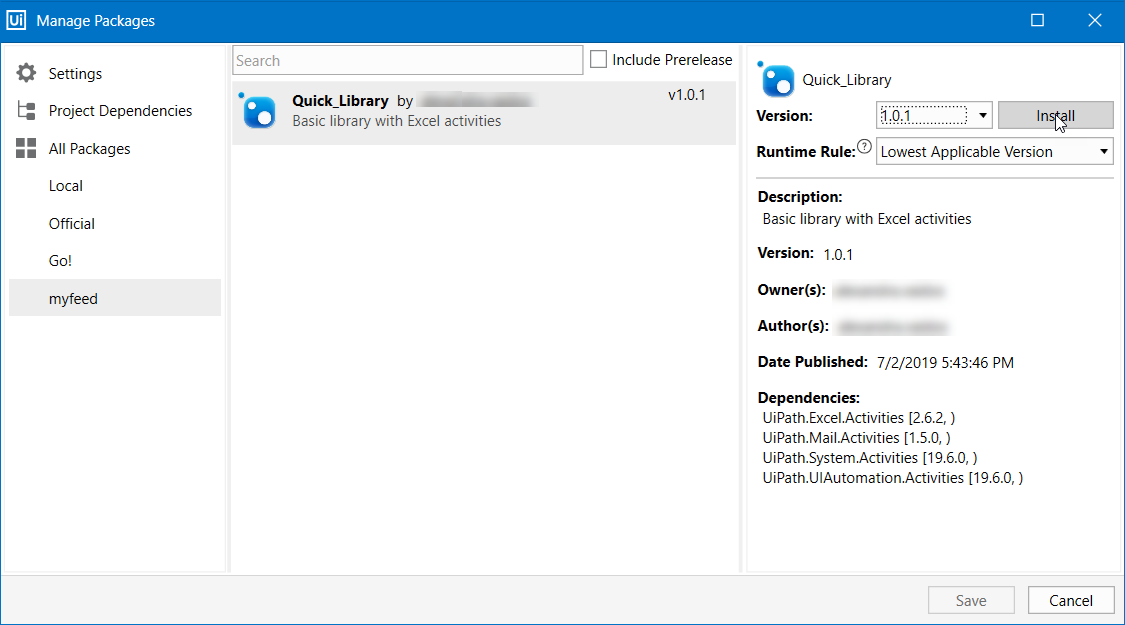
  1. In the Manage Packages window, go to the previously added feed under the All Packages tab on the left. The list of packages available on the feed is displayed.
  2. Search for the package and select it. In our example, the package name is QuickLibrary.
  3. Click Install, then Save. The package is now installed in your project, and visible in the Project panel, under Dependencies.
Adding Activities from the Library

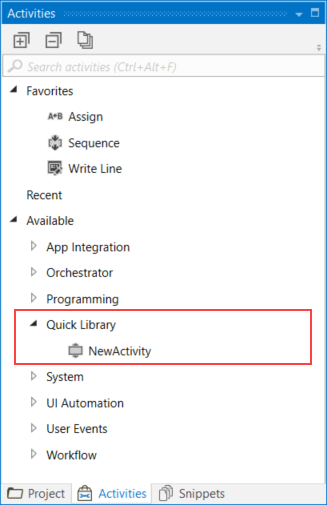
  1. In the Activities panel, search for the name of the package, in our case Quick Library.
  2. Drop the activity in the Designer panel.
  3. In the Studio ribbon, click Run File or use Ctrl + F6 to execute the activity.
You can add other activities like Copy Sheet or Auto Fill Range, but these require Microsoft Excel to be installed on your machine.

The advantage of reusable components is that they reduce repetition. You create them once and reuse them in other projects.

Define Sequences and how to use it in UiPath?

Sequences are the smallest type of project. They are suitable to linear processes as they enable you to go from one activity to another seamlessly, and act as a single block activity.

One of the key features of sequences is that they can be reused time and again, as a standalone automation or as part of a state machine or flowchart.

For example, you can create a sequence to take information from a .pdf file and add it to a spreadsheet, and reuse it in a different setting, while changing just a few properties.

Please take into consideration that whenever you wish to copy a large number of activities from one sequence to another, it is recommended to scroll down to the bottom of the Designer panel beforehand. This is due to a Windows Workflow Foundation limitation.

*Note- Sequences don't use connectors.

To create a sequence that asks the user for his first and last name, and his hair color, and then displays his answers, do the following:

  1. Create a blank process and, on the Design tab, in the File group, select New > Sequence. The New Sequence window is displayed.
  1. In the Name field type a name for the automation, such as "First Sequence", and leave the default project location or add a subfolder. Click Create. The Designer panel is updated accordingly.
  2. Create three String variables such as FirstNameLastName, and HairColor, so that you can store data from the user in them. Leave the Default field empty, to indicate that there is no default value.
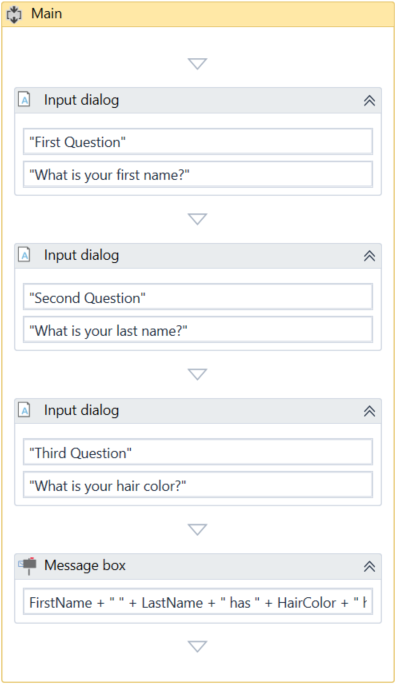
  1. Drag three Input Dialog activities to the Designer panel, one under the other.
  2. Select the first Input Dialog and, in the Properties panel, add a Label asking for the first name of the user, and a custom Title.
  3. In the Result field add the FirstName variable. This indicates that this variable is going to be updated with the value added by the user at this point.
  4. Repeat steps 6 - 7 for the second and third Input Dialog activities to ask the user for his last name and hair color, and store them in the LastName and HairColor variables.
  5. Add a Message Box activity under the third Input Dialog.
  6. Select the Message Box and, in the Properties panel, in the Text field, add the variables and a string to enable you to display all information gathered from the user, such as:
    FirstName + " " + LastName + " has " + HairColor + " hair."

The final project should look as in the following screenshot.

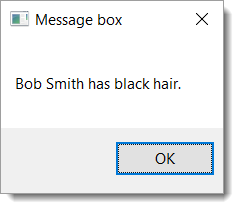
  1. On the Design tab, in the File group, click Run. The automation is executed. The final output message should look as in the following screenshot.


**********************************************************************************************************************

Define Flowcharts and how to use it in UiPath?

Flowcharts can be used in a variety of settings, from large jobs to small projects that you can reuse in other projects.

The most important aspect of flowcharts is that, unlike sequences, they present multiple branching logical operators, that enable you to create complex business processes and connect activities in multiple ways.

Flowcharts come with the Auto Arrange option in the context menu.

Try the below example to understand the use of Flowcharts:

we are going to build a guessing game that generates a random number from 1 to 999 that the user must guess. To create such an automation, do the following:

  1. Create a blank process and from the Design tab, in the File group, select New > Flowchart. The New Flowchart window is displayed.
  2. In the Name field type a name for the automation, such as "First Flowchart", and leave the default project location or add a subfolder. Click Create. The Designer panel is updated accordingly.
  3. Create two Int32 variables (RandomNumberGuessNumber) and a String one (Message).
  4. Set the default value of the Message variable to "Guess a number from 1 to 999." The RandomNumber stores a random number between 1 and 999, GuessNumber stores the user’s guess and Message stores the message that is going to be displayed to prompt the user.

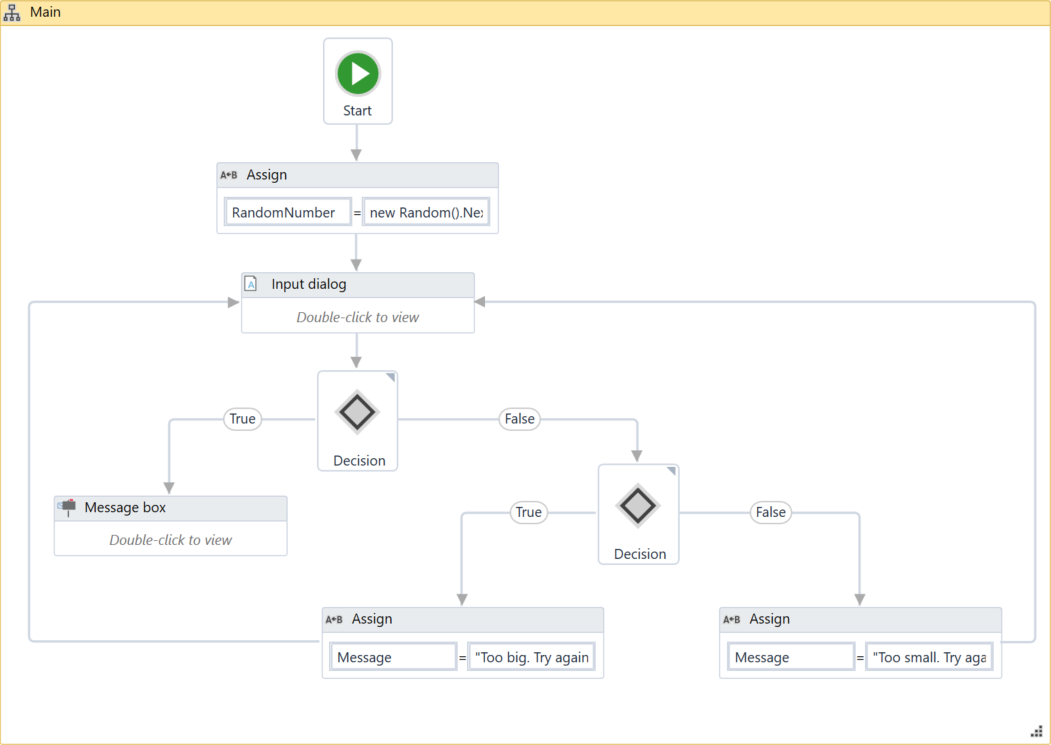
  1. Add an Assign activity to the Designer panel, and connect it to the Start node.
  2. In the Properties panel, in the To field add the RandomNumber variable.
  3. In the Value field, type new Random().Next(1,999).
  4. Add an Input Dialog activity to the Designer panel and connect it to the Assign one.
  5. In the Properties panel, in the Label field, add the Message variable.
  6. In the Result field, add the GuessNumber variable. This activity asks and stores the user’s guesses in the GuessNumber variable.
  7. Add a Flow Decision activity and connect it to the Input Dialog. This activity enables you to tell the user if he correctly guessed the number or not.
  8. In the Properties panel, in the Condition field, type GuessNumber = RandomNumber. This enables you to verify if the number added by the user is the same as the randomly-generated one.
  9. Add a Message Box activity and connect it to the True branch of the Flow Decision.
  10. In the Properties panel, in the Text field, type "Congratulations! You guessed correctly! The number was " + RandomNumber.ToString + ".". This is the message that is going to be displayed if the user correctly guessed the number.
  11. Add a new Flow Decision activity and connect it to the False branch of the previously added Flow Decision.
  12. In the Properties panel, in the Condition field, type GuessNumber > RandomNumber. This activity enables you to check if the number the user added is bigger than the randomly-generated one.
  13. In the DisplayName field, type Comparison. This enables you to easily to tell the difference between the two Flow Decisions used.
  14. Add an Assign activity and connect it to the True branch of the Comparison activity.
  15. In the To field, type the Message variable, and in the Value field, type a message indicating that the guess was too high, such as "Too big. Try again.".
  16. Select the Assign activity and press Ctrl+C. The entire activity and its properties are copied to the Clipboard.
  17. Press Ctrl + V. A duplicate of the previous Assign activity is displayed.
  18. Connect it to the False branch of the Comparison activity and, in the Properties panel, in the Value field, type "Too small. Try again.".
  19. Connect the Assign activities created at steps 18-22 to the Input Dialog. A loop is created, asking the user to type a smaller or bigger number, until he guesses correctly.

The final project should look as in the screenshot below.


***********************************************************************************************************************